.png)
.png)

 439
439
This article will help those users whose list data in QuickBooks does not match up with the data that is being exported from their other system. For instance, many other systems store list items by number whereas in QuickBooks a name is used.
In order to properly associate your transactions with the proper names in QuickBooks, Transaction Pro Importer has a cross reference feature for the following fields:
- Customer Name (via QuickBooks account no. field)
- Vendor Name (via QuickBooks account no. field)
- Employee Name (via QuickBooks field account no. field)
- Item (via a QuickBooks custom field)
- Account (via QuickBooks description field)
Customer and Vendor Cross Reference
Below, we will show how the customer cross reference works. Please note that the vendor cross reference works the same.
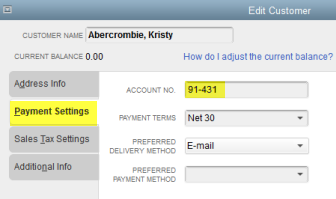
In the example below, let's assume that your other system from which you are exporting your data from utilizes account numbers instead of customer names. Your customer, Abercrombie, Kristy, is referenced in your orders database as customer 91-431. You would then need to go into QuickBooks and on the Payment Settings tab for this customer populate the account no. field with the value 91-431.
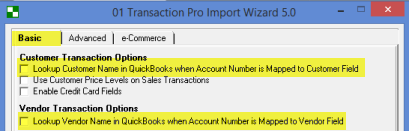
Next, within Transaction Pro, you would need to select the option from the basic tab, “Lookup Customer Name in QuickBooks when Account Number is mapped to Customer field.”
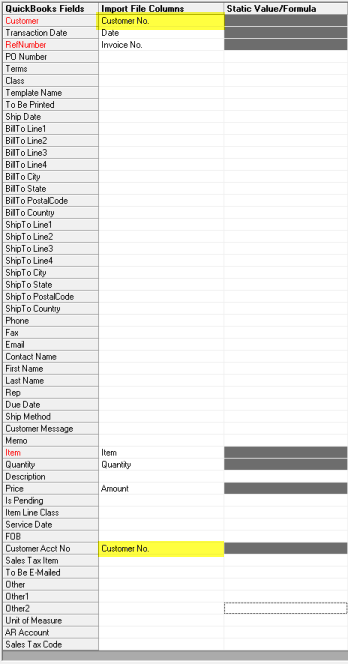
Below is an import file that does not have a customer name but instead has the customer account no.

Then, when you get to the Transaction Pro mapping screen, you will map the column, Customer Acct No., to the QuickBooks fields, Customer and Customer Acct No.
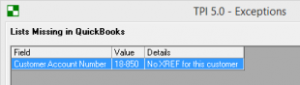
When you select the next button, Transaction Pro Importer looks through the account no. fields on all your customers. In this example, the second transaction with an account no. does not already exist with your QuickBooks company file. You will need to add this customer into your QuickBooks company file to complete the import.

Advanced tip: If the account numbers do not exist on the customer in QuickBooks, export out your customer list to Microsoft Excel and add a column for the account no. Then in Transaction Pro Importer, select customer list as the import type and map the customer name and account no. only.
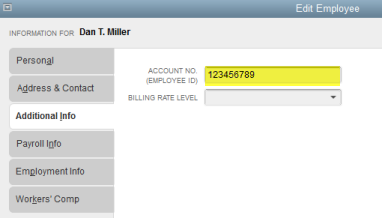
Employee Cross Reference
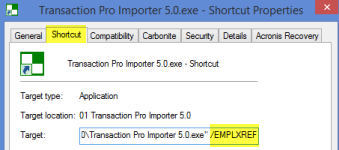
These options are similar to the customer cross reference except for the fact that it needs to be enabled via a command line parameter, -/EMPLXREF. For Transaction Pro Importer 7.0 the command line parameter is /EMPLXREfF. This option is available for time tracking imports only. Follow the instructions below to add this command line parameter.
- Make a copy of the Transaction Pro Importer 7.0 shortcut by right mouse clicking on the shortcut and select copy. Then, put your cursor on your desktop and right mouse click and select paste shortcut.
- On the new shortcut for Transaction Pro Importer 7.0 that you just created right mouse click on the icon and select properties
- On the shortcut tab at the end of the target box, leave a space after the ending quotation and type in /EMPLXREF and then select the OK button.
- Then you will use this new shortcut to launch Transaction Pro Importer 7.0.
Make sure that pre-import you have updated the account no. field on the additional info tab on your employee cards in QuickBooks.
Advanced tip: For more advanced options with Transaction Pro Importer for QuickBooks, review this article.
Item Cross Reference
This option is very similar to the customer cross reference. The only difference is that the cross reference value needs to be stored in a custom field on the item.
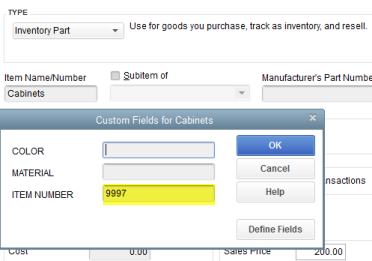
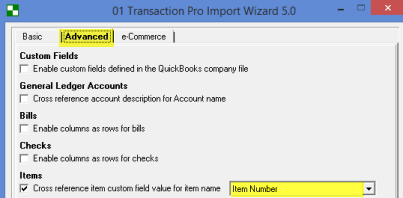
On the advanced tab of the program options, you would select the option to cross reference item custom field value for item name and in the drop down box select the custom field where this value is stored.
Advanced Tip: If you use sub items in QuickBooks but your import file does not contain both the Item and the sub item, separated by a colon but only the sub item, store the sub item name in the custom field for this item.
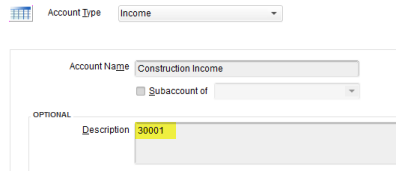
Account Cross Reference
In your QuickBooks company file, you first need to update the description field to match the account in your import file.
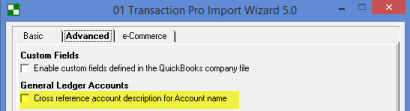
Then you need to select the option, cross reference account description for Account Name on the Advanced Tab of the program options within Transaction Pro.
Advanced tip: This option can be helpful when converting data from another QuickBooks company file or another QuickBooks company file.

