.png)
.png)

 3288
3288
Below are the steps to consider when updating from a previous version to a newer version of Rightworks Transaction Pro Importer.
Step 1: Make a note of any options that have been selected.
Open the QuickBooks company file and then launch the current Transaction Pro Importer. Select OPTIONS on the first screen of Importer and be sure to note all options that have been selected. Please note that there are three tabs of options: Basic, Advanced, and e-Commerce.
Step 2: Make note if the import file has a header row or not.
On the second screen of Importer, look to see if the box in the lower left-hand cover for FILE HAS FIELD NAMES IN THE FIRST ROW has been checked or not.
Step 3: Make a note of where all the map files are located.
The map files all have a .dat extension and are saved every time that an import is performed. The location of the map file for each import will be displayed in red at the top of the Importing mapping screen. When new version of Importer is launched, select LOAD MAP on the mapping screen and navigate to where the required map file has been saved. Please note that there can be more than one import map file if different types of imports are being performed
Step 4: Make a note of the Item Settings on the last screen of Importer.
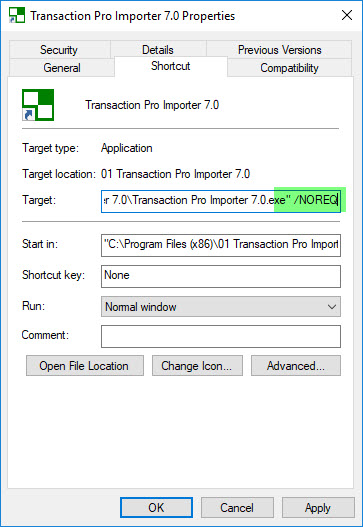
Step 5: Make a note of any command line parameters that have been enabled.
Right mouse click on the current Importer shortcut on the desktop and select PROPERTIES at the very bottom of the list. In the Shortcut field, please note any additional information that has been added to the end of the shortcut address, which will be preceded by a a forward slash (/). Read more about Command Lines HERE.
Step 6: Apply the data that has been gathered in Steps 1 – 5 to the new version installation of Transaction Pro Importer.

