 7960
7960
QUESTION
Is there a way to import both the Item Receipt and the Vendor Bill at the same time?
RESOLUTION
Yes, both transactions can be imported at the same time into QuickBooks Desktop (QBDT) using Transaction Pro Importer by using the Import Type ITEM RECEIPT W/BILL.
As an additional bonus, if the Purchase Order number is referenced, Importer will mark those items as closed on the Purchase Order at the same time also. If mapping data to the Purchase Order Number field, make sure that the Items in your import file are in the same order as they exist on the Purchase Order in QBDT.
As an example, the file below will be used to demonstrate how to import an Item Receipt with a Bill:

To import an Item Receipt with a Bill, please follow these steps:
- Open the correct QBDT company file and launch Importer.
- On the first window of Importer, select the import file by clicking the BROWSE button and locating the import file to attach to Importer.
- If importing a .txt or .csv file, be sure to select the correct FIELD delimiter. If importing an Excel worksheet, select the correct worksheet tab to import.
- Select ITEM RECEIPT W/BILL as the IMPORT TYPE.
- Click NEXT to continue.

- On the second window of Importer, if the import file has column headers, be sure to select the box in the lower left-hand corner FILE HAS FIELD NAMES IN FIRST ROW
- Click NEXT to continue.

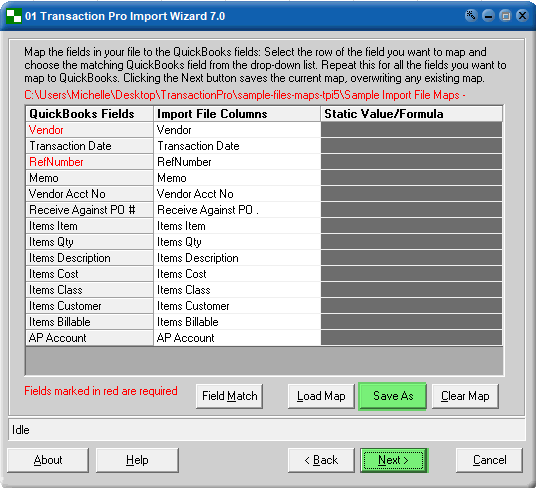
- The third window of Importer is the Mapping Window. Below is the mapping that was created for the sample import file. Under IMPORT FILE COLUMNS for each field, there will be a drop down list that shows the column headers from the import file. The correct column header needs to be mapped for each field that has data in the file. Any fields in red are required at minimum when importing this type of import.
- Once the mapping is completed, click SAVE AS to save the mapping information for the next time the file is imported. The map file can be saved under any name and in any location. The saved file will be a .dat file.
- Click NEXT to continue.

- The fourth window of Importer will display how the data from the import file is mapped to each QBDT field. Review this data to ensure that the correct data is mapped to the correct QBDT field.
- Click NEXT to continue.

- The last window of Importer refers to the default settings for any new Items that are setup during import. If any Item does not already exist in QB, then QB will set up the Item using the default settings on this screen.
- Click FINISH to start the import.

To download Sample Files and Sample Maps for testing, the files can be found attached to the Knowledge Base article found HERE.
.png)
.png)


